
Speeding Up Hay Drying: A Complete Guide
When it comes to making quality hay, timing and technique make all the difference. You want to preserve those precious nutrients while getting your crop safely stored before weather turns against you. Let's walk through each critical step that will help you speed up your drying process and protect your investment.
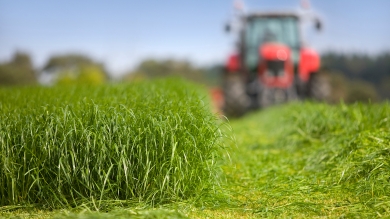
Cutting the Forage
The moment you choose to cut sets the stage for everything that follows. Producers must decide whether they are racing the weather to get a hay crop in. If so, they should cut as early as possible to maximize sunlight hours, even if it sacrifices some of the hay's nutritive value. Alternatively, they can wait until around 11 a.m. in the East or 1 p.m. in the West, allowing the grass plants to replenish the sugars used up overnight, which will result in a crop with higher nutritive value. When you're cutting, resist the urge to mow too close to the ground. Leave about 2-3 inches of stubble for alfalfa and at least 4 inches for cool-season grasses. This height isn't just good for your plants' regrowth – it actually helps with air circulation under your windrows, speeding up the drying process. Plus, you'll avoid picking up dirt and stones that can dull your equipment and reduce hay quality.
Maximizing Sunlight Exposure
Think of sunlight as your most powerful ally in the drying game. The wider you can spread your cut forage, the more surface area you expose to those drying rays. Aim to cover at least 60-70% of your cut area with a wide swath – this isn't just about efficiency; it's about harnessing every bit of solar energy available to you. When you create a full-width swath, you're essentially turning your entire field into a solar drying system. Under good conditions, this technique can drop your moisture content from 85% down to 60% in just 5-7 hours. That's the kind of progress that lets you sleep better at night, knowing you're not racing against an incoming weather front.
Conditioning the Forage
Here's where modern technology really works in your favor. Conditioning equipment breaks down the natural barriers that keep moisture locked in plant stems. Those waxy layers on alfalfa and grass stems are nature's way of preventing water loss – great for the living plant, not so great when you're trying to make hay. Roller conditioners work by crimping and cracking these stems, creating pathways for moisture to escape. Impeller conditioners take a different approach, using flexible fingers to abrade and bruise the stems. Both methods dramatically reduce drying time, and the investment in a good conditioner typically pays for itself in improved hay quality and reduced weather risk. Your stems will dry at nearly the same rate as your leaves, giving you more uniform moisture content throughout the windrow.
Tedding
Tedding is like fluffing a pillow – you're creating space for air to move and exposing buried forage to sunlight and wind. This step is particularly valuable when you're dealing with heavy crops or when your initial swath is too thick for efficient drying. The key is timing your tedding operation carefully. You want the forage to have wilted enough that it's not releasing excessive plant juices, but not so dry that you're knocking off valuable leaves. For most crops, tedding about 2-4 hours after cutting hits that sweet spot. The tedder lifts and redistributes your forage, breaking up any clumps and ensuring even exposure. You'll be amazed at how much faster your hay dries when every stem has access to moving air.
Raking
Raking requires a delicate touch and perfect timing. You're gathering your partially dried forage into windrows for final drying and baling, but you need to preserve as many leaves as possible – that's where your protein and nutrients live. The secret is raking while your forage still has some flexibility. For legumes like alfalfa, rake when moisture is still above 40%. For grasses, you can wait until it drops to around 25% moisture. At these levels, stems bend rather than break, and leaves stay attached where they belong. Modern rakes with adjustable tines and gentle action help minimize losses, but nothing replaces good judgment about when conditions are just right.
Using Desiccants
Chemical desiccants are like having a secret weapon in challenging drying conditions. These products, typically potassium carbonate or sodium carbonate, work by breaking down the waxy protective layer on plant stems. Apply them at the time of cutting, and they immediately start creating pathways for moisture to escape. This can be particularly valuable when you're cutting under less-than-ideal conditions or when weather forecasts are threatening. While desiccants add to your input costs, they often pay for themselves by reducing field time and weather risk. Think of them as insurance – you hope you don't need them, but you're glad they're there when conditions get tough.
Weather Considerations
Weather is the factor you can't control, but you can certainly work with it more effectively. Your ideal drying day combines temperatures in the 80s, bright sunshine, gentle winds around 8-12 mph, and humidity below 50%. These conditions create the perfect storm for rapid moisture removal. Wind speeds above 12 mph can actually work against you by cooling your forage and reducing the effectiveness of solar heating. Keep a close eye on your weather forecasts and remember that every inch of rain on cut forage can cost you 2-8% in dry matter losses. Those losses aren't just numbers on paper – they represent feed value and money out of your pocket.
Monitoring Moisture Levels
Moisture monitoring is where science meets art in haymaking. Your target depends on your storage method – traditional dry hay should reach 14-18% moisture, while baleage works best at 40-60% moisture. Investing in a good moisture meter takes the guesswork out of this critical decision. Remember that forage continues to respire and lose nutrients as long as moisture levels remain high, so every hour you can shave off field drying time preserves more of the feed value you worked so hard to grow. Test multiple spots in your windrows, as moisture can vary significantly even within the same field.
Baling
The finish line of haymaking is all about timing and precision. Bale too wet, and you risk spontaneous combustion or moldy hay that's worthless – or worse, dangerous. Bale too dry, and you'll watch valuable leaves shatter and blow away with every turn of your baler. When your moisture levels hit that target range, don't delay. Have your equipment ready and in good repair, because this is your moment to capture all the work you've put into the process. The satisfaction of putting up quality hay at the right moisture level – knowing it will keep well and feed your livestock properly – makes all the careful attention to these drying steps worthwhile.
By following these detailed steps, you're not just making hay – you're optimizing every stage of the process to work in your favor. Each technique builds on the others, creating a system that helps you produce better hay more reliably, regardless of what Mother Nature throws.

HayMaster® Pro
-
Quick dry-down
-
Drought tolerant
-
Soft-leaved, late-maturing mixture


